Now that we have our ESP32 ready to rock and roll it is deployment time! The first thing we need to do is to use an MQTT broker with authentication. So far we have done all our tests using the free io.eclipse.org server without any kind of authentication, this means, if somebody knows the topics you are using, could open/close your garage door. Not good!
There are plenty of options out there you can use, but I personally roll out my own broker, so I am going to explain what I have done. I will be using a Moquitto broker , from the Eclipse foundation, and of course, inside a docker container ;)
I have also created my own docker image based on the official one, adding some extra functionality to be able to specify an username and password when you create your container, so you don’t have to deal with user and configuration files. I am running my MQTT broker in a droplet in Digital Ocean. All you need to make sure you have Docker installed in the host and also you will need to open at least port 1883/tcp. To bring your container up, all you need to run if the following command:
docker run -d --name mosquitto -p 1883 --restart=always -e MOSQUITTO_USER=YOUR_USERNAME -e MOSQUITTO_PASS=YOUR_PASS tuxotron/mosquitto
Here we are running a container called mosquitto, with the option of restart automatically and the credentials YOUR_USERNAME and YOUR_PASS (make sure you change these values). This container will also disable the anonymous access to our server, so basically you will be able to connect using that one user.
The next step would be to reconfigure our ESP32 to set the correct server, username and password credentials, as we explained in part 1 of this series . Make sure you update code for this project first. From inside the directory or your project’s code:
git pull origin master
After you make the configuration changes and flash the new code. You should see something like:
I (2545) MQTT_CLIENT: Sending MQTT CONNECT message, type: 1, id: 0000
I (3195) GARAGE: MQTT_EVENT_CONNECTED
I (3195) GARAGE: sent subscribe successful, msg_id=63593
I (3195) GARAGE: sent subscribe successful, msg_id=48468
I (3205) GARAGE: sent subscribe successful, msg_id=29761
I (3205) GARAGE: sent subscribe successful, msg_id=63161
I (3215) GARAGE: MQTT_EVENT_SUBSCRIBED, msg_id=63593
I (3225) GARAGE: MQTT_EVENT_SUBSCRIBED, msg_id=48468
I (3435) GARAGE: MQTT_EVENT_SUBSCRIBED, msg_id=29761
At this point we are ready to mount the device in our garage. In my case I follow the following schema to connect the relay to both garage door openers:
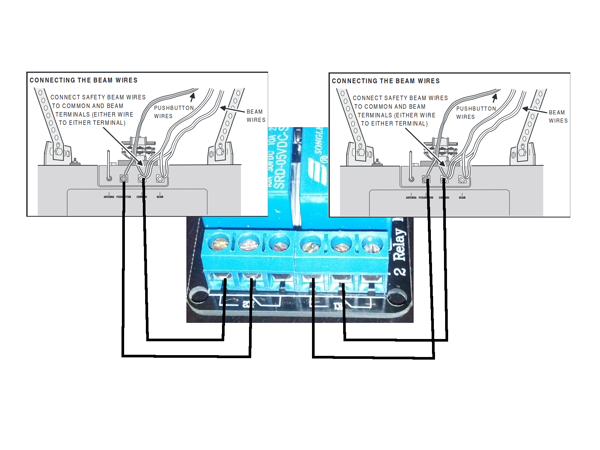
If your door opener has different connections, just look for the wires coming from the button that opens/closes your garage door and wire your relay with it.
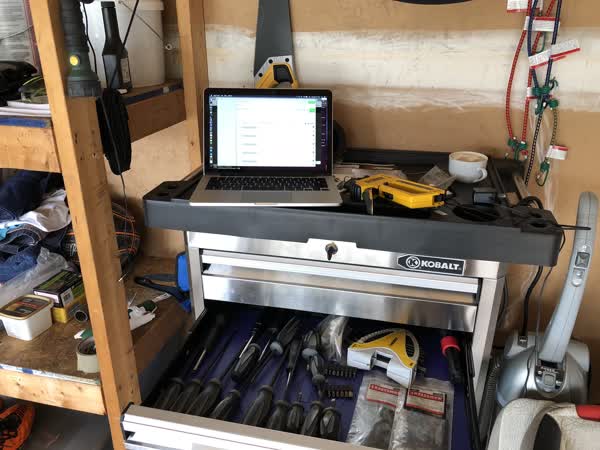
The next thing will be to mount the magnetic switches, in this case you will have find the best spot to install them. I have installed this projects in 3 different houses and I had to install the switches in different places, since the doors were different. Here is a picture of how it looks like in my current garage:

Once you have wired up your relay to the door openers and the magnetic sensors, you are good to go. Here is a video of my current installation:
At this point, all you need to do in order to interact with your ESP32 is to send messages to the MQTT broker. As you have seen in the video, I was using MQTLens, but you can use practically any client. From the command line like we have seen in previous videos, a web application, mobile application, etc.
I’m finishing up an iOS application to control the garage doors from the phone. I won’t probably publish an entry for that since I’m not going to teach iOS development, but I will make the code available in Github and I will update this entry with the link.
The next thing to do would be to enable TLS in your broker and do all the communications through it. That’s in my to-do list, but I currently have some other priorities in my agenda, so eventually I will get it done and then I will publish a new entry to describe the changes. Until then, happy hacking!
Previous parts: